If you are about to buy new binoculars, you should first set a few purchase criteria that will help you find the right model among the large selection of different models. Basic criteria should always be, the area of application, the size/magnification of the binoculars, as well as the price range. There are not many products where the price is really so decisive for quality and performance as it is for binoculars. So when you have narrowed the selection down a bit, then you have to evaluate binoculars quality.
How to evaluate binoculars?
Don’t get tricked into marketing gimmicks and glossy product descriptions. Especially when it comes to cheap products, attempts are made to deceive the uninformed buyer with unrealistic photomontages and advertising promises.
You get a very first impression of the binoculars at the moment you pick them up and when you hold them in your hand and put them to your eyes.
Inspec the instrument thoroughly from all sides, check the housing, how heavy is it, how does it feel when holding it, is it well balanced, does it have a rubber coating for grip and protection?
What is the housing made of, is it waterproof, O-ring sealed, gas purged? The housing must protect the optical parts, and the mechanics have to withstand and function in temperatures from minus whatever to scorching heat, whether humidity is high or it’s pouring rain. Are the lens caps any good, is the carrying strap soft but strong, do you need a tripod connection?
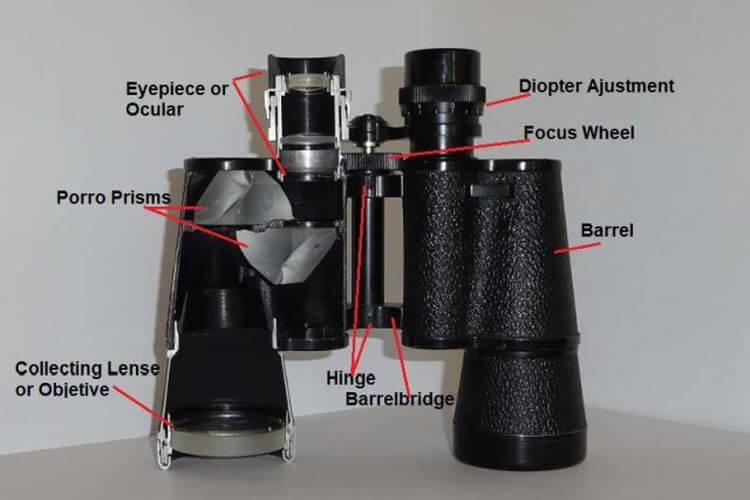
The Mechanics
The mechanics of binoculars consist of only a few moving parts which are the hinge of the middle bridge and thread-driven focus- and dioptre adjustments. Precise workmanship and robust materials, as well as a bit of care and keeping it clean, usually guarantee the mechanics will work reliably for many years.
High-quality models from the best manufacturers go before they are delivered, through a final inspection to check the immaculate workmanship and find any manufacturing faults. In cheap binocular this is rarely the case, so a detailed assessment to evaluate binoculars quality is up to you.
- Check the middle hinge, is it wobble-free and does it move smoothly through its whole range? Does it move too easily or is it too stiff? Make sure it doesn’t move by itself due to its own weight. Does it open wide enough or closes enough to accommodate your interpupillary distance (IPD).
- In Porro-prism binoculars – check the bridge that connects the eyepieces for correct alignment and that it does not wobble and move under slight pressure.
- How does the focus wheel turn? Does it turn smoothly throughout its range without jerking or hanging? Is it easy to operate with one hand while looking through the binoculars? How many revolutions are necessary to move through the entire range, one to one and a half revolutions should be enough.
- Adjustable eyecups, you should check that they can be set correctly according to the eye relief so that the entire field of view can be viewed without shadowing. Check twist-up eyecups for smooth adjustment when thread-driven, or make sure they snap into place if they are pull-out ones. Rubber eyecups should be checked for cracks.
- Inspect the eyepiece dioptre adjustment for smooth adjustment throughout its range. What is the dioptre range, is it enough to compensate for your ametropia?
Optical coatings
 The glass surfaces are usually coated to increase light transmission. The higher the quality of the instrument, the more complex and multilayered are the lens coatings.
- To check the coating, hold the instrument under bright light and look at the lenses.
- Reflections should be very weak and of a light greenish or blueish color. Strong and bright reflections indicate an inferior or missing coating. Also very bright and intense red coating, so-called ruby coatings are a gimmick designed to disguise poor optics.
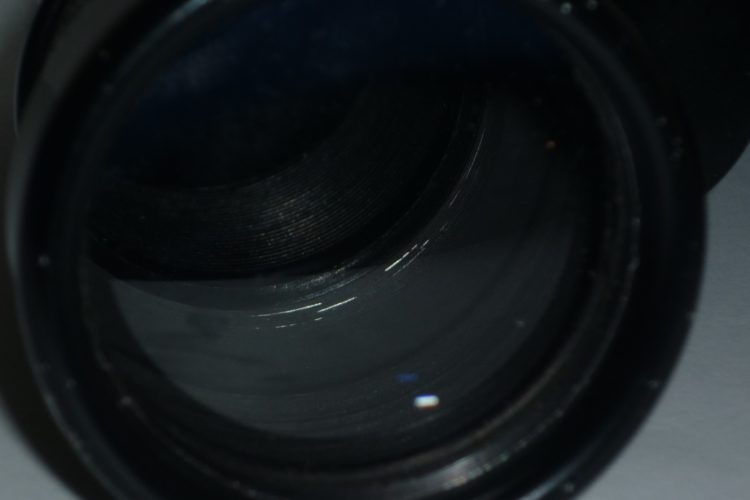
- On this occasion, look straight into the tube. The inner walls should not be shiny metallic but should be blackened evenly. This reduces annoying stray light and unwanted reflections. Very good binoculars often have lens hoods.
- Don’t forget to inspect the lenses for scratches or damage. In a new one straight out of the package, the lenses should be fault-free, otherwise, it is a warranty case. But when you buy a used older instrument, you should take a close look. Also look specifically for lense fungus.
Quality and size of the prisms
The quality and correct size of the prisms greatly affects the optical performance of binoculars.
Prisms are essential parts, their function is to reverse the mirrored and inverted images.
Prisms that are too small (cost-cutting) and do not match the instruments’ optical values, lead to loss of light and shadowing in the exit pupil.
The use of the cheaper BK7 vs BaK4 glass types also affects the optical performance of the instrument.
How to check the prisms

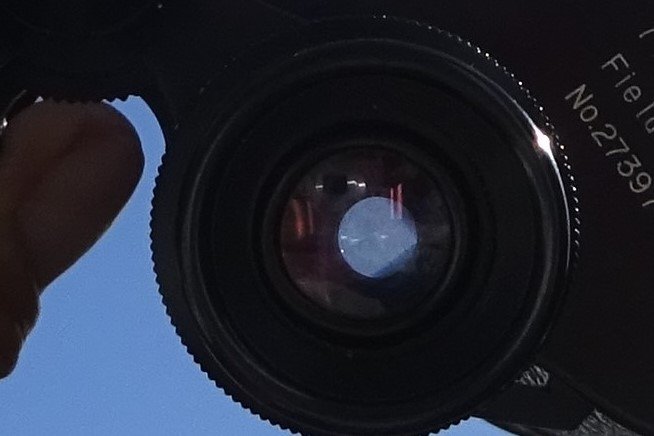
The prisms can be checked by holding the binoculars about an arm’s length out, in front of a bright background.
Then look into the lens of the eyepiece from the distance to evaluate binoculars exit pupils, check that they are completely round and evenly illuminated.
If the exit pupil appears truncated, square or with bars at the edge, this indicates that prisms are undersized and/or the use of BK7 glass instead of BAK4 glass which has a higher refractive index.
Check The Collimation
For fatigue-free vision, it is of the utmost importance that the optical axes of the two binocular barrels are precisely adjusted to each other – this is called collimation. If the axes are not exactly aligned, the projected images do not overlap properly. The brain can compensate for a slight miss-collimation, but this is very tiring and can lead to a headache.
- To test, aim at a distant target and focus. If double images or double contours appear, the optical axes are not collimated, either the prisms have to be readjusted or the hinge-bridge is defective. As a further test method, look at a straight line, preferably the horizon. Close and open your eyes alternately. If the instrument is not exactly adjusted, the horizon jumps vertically up and down.
Close focus
If close-up observations are important for you, in order to study insects or observe birds in detail from a bird hide, then it is important that the device also has an acceptable close focus range. In general, roof-prism binoculars are more suitable for observing objects in close range, good instruments have a close focus of under 6 feet (2 meters). With Porro prisms binoculars, the close focus range is usually not below 9 feet (3 meters).
Eye Relief
If you are wearing eyeglasses and are dependent on wearing your glasses when using the binoculars, then you need to consider eye relief. Eye-glasses reset the eyes a little further away from the eyepiece, so the eye relief must be a little longer. Ideally an eye relief of at least 16 mm so that there is no impairment of the field of vision.
Optical performance Sharpness and Edge Blur

The laws of optics cause unavoidable aberrations in optical instruments. The higher the quality of the optical glass and the more expensive the instrument, the more can the optical aberrations be compensated.
- Check for spherical aberration – edge blur. Aim the instrument at an object and focus it exactly in the center of the field of view. Now move the instrument so that the object moves from the center to the edge of the field of view. The sharpness will decrease towards the edge. The image should remain sharp up to about 80 percent of the field of view. A sharp, focused image closer to the edge of the field of view can only be achieved with high-end and premium instruments.
- This test can also easily be carried out on a star. A good instrument will show the star in the middle of the field of view as a point. If you swing the star towards the edge of the field of view, the point becomes blurred.
Chromatic Aberration – Colour Fringing
Chromatic aberration is the appearance of color defects. You may see green and red or blue and yellow color fringes at high-contrast light-dark transitions.
Chromatic aberration is an effect of optical lenses that arises from the fact that light of different wavelengths or colors is refracted to different degrees.
Binoculars designers build complex lens systems to use the different glass properties to compensate for this effect as much as possible.
The fewer color fringes and the further away they appear from the center of the field of view, the higher the quality of the optical components and the know-how of the binocular designers.
In cheap binoculars, strong color fringes can also be seen in the middle of the field of view, especially when bright, high-contrast objects are observed.
Distortion

The distortion is a geometrical aberration of optical systems, which leads to a local change in the imaging scale. The change in scale is based on the difference in magnification between the center of the field of view and the edge area. (Magnification differs depending on the distance of the image from the optical axis)
- To test this, aim at a power pole or a radio antenna. It should appear straight. When you pan the binoculars so that the pole is moved towards the edge of the field of view, the mast becomes distorted, it no longer seems straight but bends.
All lenses have the property of distorting the enlarged images. The magnification in the middle of the image is different than on the edge of the image. This is an effect based on optical laws and the binocular designer tries to compensate for this. This can be a complex task and affects the price of binoculars.
Evaluate Binoculars In The field
Reading the binocular specs, a first visual impression, the feeling of how the binoculars are handled, followed by a check of the mechanical functions and the optical properties are important steps to evaluate binoculars.
But all this cannot replace a final assessment on-site under real application conditions. So the next step is to take the device with you into the field if possible and try out the binoculars. You can only really evaluate binoculars under real conditions and after using them for a while. It also takes time to get used to new binoculars.
More to Learn:
About Aberration in optical systems physics.info/aberration/
About Distortion and Globe Effect holgermerlitz.de/globe/distortion.html


